- Firstly install "7 zip" program.
- Then download virtual machine files from this link (download) . After downloading parts select all parts and right click. Then select "7 zip" menu and select "extract here" section.
- Kopy Image key file "VB Image Key File" same location to extracted parts.
- Install "Virtual box" program. Double click "Sampleapp_v107_GA" file and click import button.
- Depending on your network configuration and the option selected in the virtual box settings, you may need to configure the hosts file to point it to the correct IP address. Services will not start properly if the IPaddress is not correct. Please follow the steps below to configure the hosts file: Get the IP address of the image – For this, open a terminal window on the running image, and type the command /sbin/ifconfig. Note down the IP address under the heading “inet addr” (e.g.: inet addr:192.168.56.101) Navigate to folder /etc/hosts and edit the file so that the entry demo.us.oracle.com points to the correct IP address of your machine Save the file and proceed to starting service
- Sequence for service starting scripts
18 Temmuz 2012 Çarşamba
How To Install Oracle Bussiness Intelligence Virtual Machine
8 Nisan 2012 Pazar
Periodic Noise Reduction by Frequency Domain Filtering
This blog explain how to minimize periodic noise by frequency domain filtering using matlab. There ara some filtering methods. Picture1 has some periodic noise,firstly we convert this picture to frequency domain in matlab.
We can use "Data Cursor" of matlab figure viewer to find noise's location. (Picture: Points Of Noise)


mesh(C*5+1);


 |
| Picture1 |
KOD:This code show picture in frequency domain with logaritmic improvement(Picture 2)
>> r2=rgb2gray(imread('n3.jpg'));
>> fr2=fft2(r2);
>>imshow(log(1+abs(fftshift(fr2))),[]);
 |
| Picture: 2 |
 |
| Picture Points Of Noise |
1. First Method
1.1 Mask 1
KOD: There are six point on the picture,its my be noise, First method clearing this noise with mutiply this area(six point) to zero. Picture size is 206x245. Our mask is ones(206,245),but change only six point area to zero like Picture 3 . We can create this points with using "Points Of Noise" picture. We use +-1 pixel neighboardless arround the this points.
>> m=ones(206,245);
m(59:1:61,122:1:124)=0;
m(79:1:81,73:1:75)=0;
m(124:1:126,73:1:75)=0;
m(146:1:148,122:1:124)=0;
m(81:1:83,171:1:173)=0;
m(125:1:127,172:1:174)=0;
imshow(m);
 |
| Picture 3 |
KOD:If we multiply this mask and frequency domain,Picture 4 is formed.
>> imshow(log(1+abs( fftshift(fr2).*m)),[]);
 |
| Picture 4 |
KOD: ifft2 function is converting frequeny domain to begining domain.Firs method of filtering finished. There are some improvement on the Picture 5
imshow(log(1+abs(ifft2( fftshift(fr2).*m))),[]);
 |
| Picture 5 |
1.2 Mask 2
KOD:If our rectangle of six point is larger then Picture 3,There may be some better improvement then Picture 5. We use +-2 pixel neighboardless arround the this points.
>> m(58:1:62,121:1:125)=0;
>> m(78:1:82,72:1:76)=0;
>> m(123:1:127,72:1:76)=0;
>> m(145:1:149,121:1:125)=0;
>> m(80:1:84,170:1:174)=0;
>> m(124:1:128,171:1:175)=0;
>> imshow(log(1+abs(fftshift(fr2).*m)),[]);
 |
| Picture 6 |
KOD: Converting Picture 6 to begining domain
>> imshow(log(1+abs(ifft2( fftshift(fr2).*m))),[]);
 |
| Picture 7 |
2. Second Method
2.1 Introduction of circular function
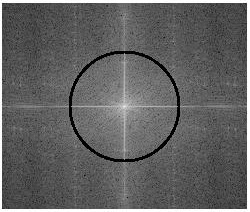
KOD: Frequency domain have circular spread. If the mask is circular ,there maybe better improvement than Picture 7 and Picture 5.Firstly I want to explain how to draw circle on matris of our mask.
The center of the circle is (a,b) point. The function of circle has shown very sipmly (x-a)^2+(y-b)^2=r^2 on Picture 8.If we square both right and left of equal,there are sqrt((x-a)^2+(y-b)^2)=r function.
 |
| Picture 8 |
Example:
r=2.5 and a=5 and b=5
>> [X Y] = meshgrid(1:10);
>> C = sqrt((X-5).^2+(Y-5).^2)<=2.5

We want to draw six point of noise with circle and this circle's variables are zeros for clearing noise
C = sqrt((X-5).^2+(Y-5).^2)>=2.5
C = sqrt((X-5).^2+(Y-5).^2)>=2.5

We do not want to filled circle
>> C = sqrt((X-5).^2+(Y-5).^2)>=2.5|sqrt((X-5).^2+(Y-5).^2)<=1;
>> C = sqrt((X-5).^2+(Y-5).^2)>=2.5|sqrt((X-5).^2+(Y-5).^2)<=1;

2.2 Creating Mask
Now we can draw our real filter. We need to point center of the circle.
Center=(123,104)
a=123,b=104
r=104-60=148-104=44
formula=>sqrt((x-a)^2+(y-b)^2)=r =>sqrt((x-123)^2+(y-104)^2)=44
We want to thick circle and we must find an epsilon to do this. If the epsion is numeric number of two our formula change like this: sqrt((x-123)^2+(y-104)^2)=(44+2) | sqrt((x-123)^2+(y-104)^2)=(44-2)
KOD
[X,Y]=meshgrid(1:245,1:206)
>> C = sqrt((X-123).^2+(Y-104).^2)>=46|sqrt((X-123).^2+(Y-104).^2)<=42;
>> imshow(C);
 |
| Picture |
mesh(C*5+1);

2.3 Multiplying mask and frequensy domain of picture
imshow(log(1+abs( fftshift(fr2).*C)),[]);
There are four noise whice not drowed. We must onother circle to draw this four noise. We can use Picture: Point of Noise
C = sqrt((X-123).^2+(Y-104).^2)>=56|sqrt((X-123).^2+(Y-104).^2)<=53;
imshow(log(1+abs( fftshift(fr2).*C)),[]);
2.4 Concatenate the circles
We must to concatenete this circles
>> C1 = sqrt((X-123).^2+(Y-104).^2)>=46|sqrt((X-123).^2+(Y-104).^2)<=42;
>> C2 = sqrt((X-123).^2+(Y-104).^2)>=56|sqrt((X-123).^2+(Y-104).^2)<=53;
>> CS=(C1+C2)>1;
>> mesh(CS*10+1);

>> imshow(log(1+abs( fftshift(fr2).*CS)),[]);
2.5 Result of masks
2.5.1 Result of C1 mask
imshow(log(1+abs(ifft2( fftshift(fr2).*C1))),[]);
2.5.2 Result of C2 mask
imshow(log(1+abs(ifft2( fftshift(fr2).*C2))),[]);
2.5.3 Result of CS mask
imshow(log(1+abs(ifft2( fftshift(fr2).*CS))),[]);
Custom Ribbon in Sharepoint 2010
This blog explain how to create your own ribbon for sharepoint.
.bmp)
1. Open your project and right click your solution and select "add" tab and then select "Sharepoint mapped folder..." tab .when you select this tab the window opens.
.bmp)
2. Create "Scripts" and "Icons" sub folder in "Layouts" folder.Add Icon to Icons Folder(16x16 and 32x32). Add script to scripts folder.
function showAll() {
var ctx = SP.ClientContext.get_current();var ItemIds = "";
var listId = SP.ListOperation.Selection.getSelectedList();
var selectedItems = SP.ListOperation.Selection.getSelectedItems(ctx);
for (var i = 0; i < selectedItems.length; i++) {
ItemIds += selectedItems[i].id + ",";}
var pageUrl = SP.Utilities.Utility.getLayoutsPageUrl(
'/_layouts/ReportHandler.ashx?id=' + ItemIds + '&listid=' + listId);var options = SP.UI.$create_DialogOptions();
options.width = 520;
options.height = 380;
options.url = pageUrl;
options.dialogReturnValueCallback = Function.createDelegate(null, OnDialogClose);
SP.UI.ModalDialog.showModalDialog(options);
}
function enableAll() {
var ctx = SP.ClientContext.get_current();return SP.ListOperation.Selection.getSelectedItems(ctx).length > 1;
}
function showSingleControlReport() {
debugger;var ctx = SP.ClientContext.get_current();
var web = ctx.get_web();
var ItemIds = "";
var listId = SP.ListOperation.Selection.getSelectedList();
var selectedItem = SP.ListOperation.Selection.getSelectedItems(ctx)[0];
var pageUrl = '/_layouts/ReportHandler.ashx?id=';
var options = SP.UI.$create_DialogOptions();
options.width = 520;options.height = 380;
options.url = pageUrl + selectedItem.id + '&listid=' + listId+'&rType=itk';
options.dialogReturnValueCallback = Function.createDelegate(null, OnDialogClose);
window.location.href = options.url;
}
function enableSingleControlReport() {
var ctx = SP.ClientContext.get_current();var selectedItems = SP.ListOperation.Selection.getSelectedItems(ctx);
return selectedItems.length == 1;
}
function OnDialogClose(result, target) {
if (result == SP.UI.DialogResult.OK) {location.reload(true);
}
}
3.Right click your solution and select "new item" tab and then select "Empty Element" on sharepoint tab
.bmp)
4. Set your Element.xml file in "Empy Element" control like this...
<?xml version="1.0" encoding="utf-8"?>
<Elements xmlns="http://schemas.microsoft.com/sharepoint/">
<CustomAction
Id="COB.SharePoint.Ribbon.NewControlInExistingGroup2"
Location="CommandUI.Ribbon.ListView"
RegistrationType="ContentType"
RegistrationId="0x0100EDEEEBA3D546EC4D9C55CADF92A70381">
<CommandUIExtension>
<CommandUIDefinitions>
<CommandUIDefinition Location="Ribbon.ListItem.Workflow.Controls._children">
<Button Id="COB.SharePoint.Ribbon.NewControlInExistingGroup2.Notify"
Command="COB.Command.NewControlInExistingGroup2.Notify"
Sequence="21"
Image16by16="/_layouts/Icons/word16x16.png"
Image32by32="/_layouts/Icons/word32x32.png"
Description="Uses the notification area to display a message."
LabelText="Raporu İndir"
TemplateAlias="o1"/>
</CommandUIDefinition>
</CommandUIDefinitions>
<CommandUIHandlers>
<CommandUIHandler
Command="COB.Command.NewControlInExistingGroup2.Notify"
EnabledScript="javascript:enableSingleControlReport();"
CommandAction="javascript:showSingleControlReport(); "/>
</CommandUIHandlers>
</CommandUIExtension>
</CustomAction>
<CustomAction
Id="COB.Command.NewControlInExistingGroup2.Notify.Script"
Location="ScriptLink"
ScriptSrc ="/_layouts/Scripts/CADownloadControlReport.js"/>
</Elements>
5.Your custom ribbon is ready to use.You only set your ReportHandler.ashx (may be aspx) page and doing some thing in this page (or handler). You can get selected item id's in your page querystring and do something to listitems where selected in list. You can get selected item id with key of "id" from query string and you can get list id with key of "listid" from query string of page.
28 Mart 2012 Çarşamba
Changing Executable Path Of Windows Services
Open regedit (start=>run=>"regedit" command and enter)
Go this directory
HKEY_LOCAL_MACHINE=>SYSTEM=>CurrentControlSet(May be Control Set1 or Control Set1 )=> Services =>YourServiceName=> ImagePath
27 Mart 2012 Salı
HTML Filtering
This blog explain how to filter your html. You may want to replace some word with another or you may delete some world in html.You have to configure your webconfig file and write your module in the <modules> tab .This code handle client request and change it when posting this request to client.
Code
/// <summary>/// Html içeriğinin kelime filtrelemsini sağlayan modül
/// </summary>
public class WordFilterModule : IHttpModule
{
/// <summary>
/// Oluşturulduğunda çalışacak metod
/// </summary>
/// <param name="app"></param>
public void Init(HttpApplication app)
{
app.ReleaseRequestState += new EventHandler(InstallResponseFilter);
}
/// <summary>
/// Filtrenin yüklenmesini sağlayan metod
/// </summary>
/// <param name="sender"></param>
/// <param name="e"></param>
private void InstallResponseFilter(object sender, EventArgs e)
{
HttpResponse response = HttpContext.Current.Response;
HttpRequest request = HttpContext.Current.Request;
//if (GeneralFunction.UsersResponces.ContainsKey(HttpContext.Current.User.Identity.Name))
//{
// GeneralFunction.UsersResponces[HttpContext.Current.User.Identity.Name] = HttpContext.Current;
//}
//else
//{
// GeneralFunction.UsersResponces.Add(HttpContext.Current.User.Identity.Name, HttpContext.Current);
//}
if (response.ContentType == "text/html")
{
//Debug.Write("in InstallResponseFilter()");
response.Filter = new ModifyHtmlContentFilter(response.Filter);
}
}
/// <summary>
///Nesne ramden silindiğinde çalışacak metod
/// </summary>
public void Dispose()
{ }
}
Code to Deleting Folder and All Content In It From Command Promp
Code to Deleting Folder and All Content In It From Command Promp
rd /s /q c:\rootFolder
This code deletes rootFolder , if root folder is imported for you
md c:\rootFolder
this code creates a folder
rd /s /q c:\rootFolder
This code deletes rootFolder , if root folder is imported for you
md c:\rootFolder
this code creates a folder
Frekans Bölgesi ve Fourier Dönüşümü
Frekans Bölgesi ve Fourier Dönüşümü
Şekilleri sin ve cos fonksiyonları kullanarak ifade etmeye Fourier Dönüşümü denir. Doğadaki nesne şekilleri sin ve cos fonksiyonlarının toplamı şeklinde ifade edilebilir.

Şekil 1 deki resme forurier dönüşümü uygulandığında Şekil 2 deki resim oluşur.Bu resmin görünebilmesi için bir takım değişiklikler yapılmıştır. Aksi taktirde ortadaki kare o kadar açık renktedir ki aradaki tonlama farkı bunu ifade edemez.

Şekil 1 deki resme forurier dönüşümü uygulandığında Şekil 2 deki resim oluşur.Bu resmin görünebilmesi için bir takım değişiklikler yapılmıştır. Aksi taktirde ortadaki kare o kadar açık renktedir ki aradaki tonlama farkı bunu ifade edemez.

Sekil 1
Kod
rk=imread('r_kare.bmp');
f=fft2(rgb2gray(rk));
imshow(fftshift(log(1+abs(f))),[]);

Frekans uzayını yükselen ve alçalan değerler ile çarpma
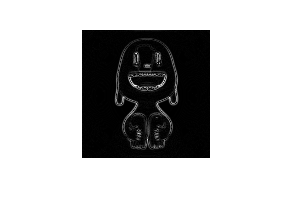
Eğer frekans uzayını yükselen değerler ile çarparsak renk geçişleri daha belirgin olur , bir başka değişle kenarları çizmiş oluruz.Eğer alçalan değer ile çarparsak yüksek renk geçişleri düşer yani kenarlar belirginsizleşir ve resim matlaşır. Burada anlatılacak kodlarda sadece maske(“m”) değişkeni değişmektedir.
Kod
r=rgb2gray(imread('r_robot.bmp'));
f=fft2(r);
m=fft2([-1 -1 -1;-1 8 -1;-1 -1 -1],128,128);
g=m.*f;
t=ifft2(g);
imshow(abs(t),[]);
Yüksen
Birinci Maske
-1
|
-1
|
-1
|
-1
|
8
|
-1
|
-1
|
-1
|
-1
|
M1=fft2([-1 -1 -1;-1 8 -1;-1 -1 -1],128,128);
 |
 |
İkinci Maske
0
|
-1
|
0
|
-1
|
4
|
-1
|
0
|
-1
|
0
|
M2==fft2([0 -1 0;-1 4 -1;0 -1 0],128,128);
 |  |
Alçalan
Birinci Maske
1
|
2
|
1
|
2
|
4
|
2
|
1
|
2
|
1
|
M3=fft2([1 2 1; 2 4 2;1 2 1],128,128);
 |
 |
İkinci Maske
1
|
1
|
1
|
1
|
1
|
1
|
1
|
1
|
1
|
M4=fft2([1 1 1; 1 1 1;1 1 1],128,128);
 |
 |
21 Mart 2012 Çarşamba
Serilizing objects to string and Deserilizing objects from string
If you like working with object this solution help you. You may save your class and use this class when you want.
Code
public static class Extensions{
public static object GetClassFromString<T>(this string str)
{
T rtnObject;
using (StringReader reader = new StringReader(str))
{
XmlSerializer ser = new XmlSerializer(typeof(T));
rtnObject = (T)ser.Deserialize(reader);
reader.Close();
}
return rtnObject;
}
public static string GetXmlStringFromClass(this object obje)
{
string XmlData = null;
using (MemoryStream mstr = new MemoryStream())
{
XmlTextWriter xtw = new XmlTextWriter(mstr, Encoding.Default);
XmlSerializer xs = new XmlSerializer(obje.GetType());
xs.Serialize(xtw, obje);
UTF8Encoding enc = new UTF8Encoding();
XmlData = enc.GetString(mstr.ToArray());
xtw.Close();
mstr.Close();
}
return XmlData;
}
}
Kaydol:
Kayıtlar (Atom)