 |
| Picture1 |
KOD:This code show picture in frequency domain with logaritmic improvement(Picture 2)
>> r2=rgb2gray(imread('n3.jpg'));
>> fr2=fft2(r2);
>>imshow(log(1+abs(fftshift(fr2))),[]);
 |
| Picture: 2 |
 |
| Picture Points Of Noise |
1. First Method
1.1 Mask 1
KOD: There are six point on the picture,its my be noise, First method clearing this noise with mutiply this area(six point) to zero. Picture size is 206x245. Our mask is ones(206,245),but change only six point area to zero like Picture 3 . We can create this points with using "Points Of Noise" picture. We use +-1 pixel neighboardless arround the this points.
>> m=ones(206,245);
m(59:1:61,122:1:124)=0;
m(79:1:81,73:1:75)=0;
m(124:1:126,73:1:75)=0;
m(146:1:148,122:1:124)=0;
m(81:1:83,171:1:173)=0;
m(125:1:127,172:1:174)=0;
imshow(m);
 |
| Picture 3 |
KOD:If we multiply this mask and frequency domain,Picture 4 is formed.
>> imshow(log(1+abs( fftshift(fr2).*m)),[]);
 |
| Picture 4 |
KOD: ifft2 function is converting frequeny domain to begining domain.Firs method of filtering finished. There are some improvement on the Picture 5
imshow(log(1+abs(ifft2( fftshift(fr2).*m))),[]);
 |
| Picture 5 |
1.2 Mask 2
KOD:If our rectangle of six point is larger then Picture 3,There may be some better improvement then Picture 5. We use +-2 pixel neighboardless arround the this points.
>> m(58:1:62,121:1:125)=0;
>> m(78:1:82,72:1:76)=0;
>> m(123:1:127,72:1:76)=0;
>> m(145:1:149,121:1:125)=0;
>> m(80:1:84,170:1:174)=0;
>> m(124:1:128,171:1:175)=0;
>> imshow(log(1+abs(fftshift(fr2).*m)),[]);
 |
| Picture 6 |
KOD: Converting Picture 6 to begining domain
>> imshow(log(1+abs(ifft2( fftshift(fr2).*m))),[]);
 |
| Picture 7 |
2. Second Method
2.1 Introduction of circular function
KOD: Frequency domain have circular spread. If the mask is circular ,there maybe better improvement than Picture 7 and Picture 5.Firstly I want to explain how to draw circle on matris of our mask.
The center of the circle is (a,b) point. The function of circle has shown very sipmly (x-a)^2+(y-b)^2=r^2 on Picture 8.If we square both right and left of equal,there are sqrt((x-a)^2+(y-b)^2)=r function.
 |
| Picture 8 |
Example:
r=2.5 and a=5 and b=5
>> [X Y] = meshgrid(1:10);
>> C = sqrt((X-5).^2+(Y-5).^2)<=2.5


We want to draw six point of noise with circle and this circle's variables are zeros for clearing noise
C = sqrt((X-5).^2+(Y-5).^2)>=2.5
C = sqrt((X-5).^2+(Y-5).^2)>=2.5


We do not want to filled circle
>> C = sqrt((X-5).^2+(Y-5).^2)>=2.5|sqrt((X-5).^2+(Y-5).^2)<=1;
>> C = sqrt((X-5).^2+(Y-5).^2)>=2.5|sqrt((X-5).^2+(Y-5).^2)<=1;


2.2 Creating Mask
Now we can draw our real filter. We need to point center of the circle.

Center=(123,104)
a=123,b=104
r=104-60=148-104=44
formula=>sqrt((x-a)^2+(y-b)^2)=r =>sqrt((x-123)^2+(y-104)^2)=44
We want to thick circle and we must find an epsilon to do this. If the epsion is numeric number of two our formula change like this: sqrt((x-123)^2+(y-104)^2)=(44+2) | sqrt((x-123)^2+(y-104)^2)=(44-2)
KOD
[X,Y]=meshgrid(1:245,1:206)
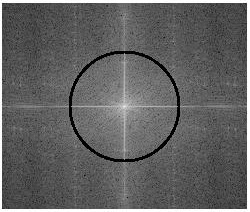
>> C = sqrt((X-123).^2+(Y-104).^2)>=46|sqrt((X-123).^2+(Y-104).^2)<=42;
>> imshow(C);
 |
| Picture |
mesh(C*5+1);

2.3 Multiplying mask and frequensy domain of picture
imshow(log(1+abs( fftshift(fr2).*C)),[]);

There are four noise whice not drowed. We must onother circle to draw this four noise. We can use Picture: Point of Noise
C = sqrt((X-123).^2+(Y-104).^2)>=56|sqrt((X-123).^2+(Y-104).^2)<=53;
imshow(log(1+abs( fftshift(fr2).*C)),[]);
2.4 Concatenate the circles
We must to concatenete this circles
>> C1 = sqrt((X-123).^2+(Y-104).^2)>=46|sqrt((X-123).^2+(Y-104).^2)<=42;
>> C2 = sqrt((X-123).^2+(Y-104).^2)>=56|sqrt((X-123).^2+(Y-104).^2)<=53;
>> CS=(C1+C2)>1;
>> mesh(CS*10+1);

>> imshow(log(1+abs( fftshift(fr2).*CS)),[]);

2.5 Result of masks
2.5.1 Result of C1 mask
imshow(log(1+abs(ifft2( fftshift(fr2).*C1))),[]);

2.5.2 Result of C2 mask
imshow(log(1+abs(ifft2( fftshift(fr2).*C2))),[]);

2.5.3 Result of CS mask
imshow(log(1+abs(ifft2( fftshift(fr2).*CS))),[]);

.bmp)
.bmp)
.bmp)